
To build performant Flutter applications, you must master the art of keeping the main UI thread clear. This inevitably leads to the concepts of concurrency and parallelism. While developers often use these terms interchangeably, in the world of Dart and Flutter, they mean very distinctly different things and are handled using completely different mechanisms.
Let’s break down the differences and look at how to properly offload work in your Flutter apps.
Table of Contents
---
The Core Concept: Concurrency vs. Parallelism
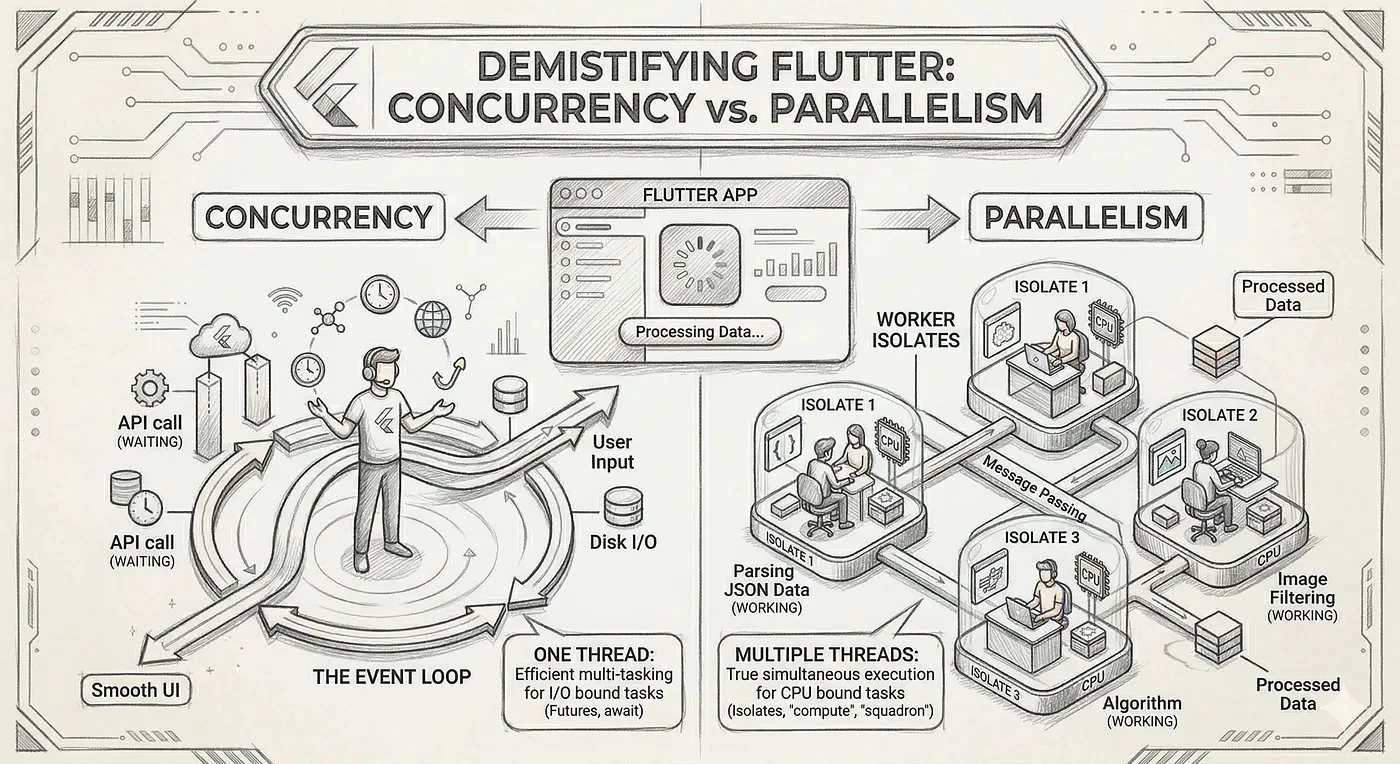
Dart, by default, is a single-threaded language. It handles concurrency out of the box, but you have to specifically ask it for parallelism.
---
Concurrency in Dart: The Event Loop and Futures
When a Flutter app starts, it creates a single thread of execution known as the Main Isolate. This main isolate contains an Event Loop. The Event Loop’s job is simple: it constantly checks a queue for events (like user taps, UI repaints, or network responses) and processes them one by one.
When you use async, await, and Future, you are utilizing concurrency. You are telling the Event Loop, "I'm going to start this task, but it's going to take a while to finish (like waiting for a network response). Feel free to go do other things, and I'll let you know when I'm ready."
// The Event Loop is free to update the UI while waiting for the network
Future<void> fetchChatMessages() async {
  final response = await apiServer.get('/messages');
  // ... process response
}
---
The Trap: When Futures Block the UI
The danger arises when developers assume async means "background thread." It doesn't.
If you await a heavy, CPU-intensive task (a CPU-bound task) within a Future, the Event Loop must execute that heavy computation on the main thread once the Future resolves.
Imagine building a complex chat application or a rich digital journaling app. If your app downloads a massive, heavily nested JSON payload of user history, the network request itself is fast (I/O bound). However, the act of parsing that JSON string into Dart objects requires raw CPU power. If it takes 200 milliseconds to parse, your Event Loop is blocked for 200 milliseconds. Since Flutter aims to render a frame every 16ms (for 60fps), your app just skipped a dozen frames.
This is where you need true parallelism.
---
Parallelism in Dart: Enter Isolates
To achieve parallelism — to hire that second chef — Dart uses Isolates.
Unlike threads in languages like Java or C++, Dart Isolates do not share memory. Every Isolate has its own isolated block of memory and its own Event Loop. Because they don’t share memory, you avoid the classic multi-threading nightmares like deadlocks and race conditions. Instead, Isolates communicate by passing messages back and forth.
---
The Foundation: SendPort and ReceivePort
Before the convenience of higher-level wrappers, managing isolates meant getting your hands dirty with the underlying communication channels: Ports. Because isolates do not share memory, they communicate like two separate servers talking over a network connection.
To achieve this, you use a ReceivePort (to listen for incoming messages) and a SendPort (the exact address you hand to someone else so they can send messages back to your ReceivePort).
import 'dart:isolate';

// 1. The top-level entry point for the new isolate.
// It MUST take a SendPort as an argument to know where to send data back.
void parseHeavyJson(SendPort mainSendPort) {
  // Simulate heavy lifting...
  final parsedData = ["Message 1", "Message 2", "Message 3"];

  // Send the result back to the main thread
  mainSendPort.send(parsedData);
}

Future<void> loadData() async {
  // 2. Create a port on the main thread to listen for the result
  final receivePort = ReceivePort();

  // 3. Spawn the isolate, handing it the SendPort so it can reply to us
  await Isolate.spawn(parseHeavyJson, receivePort.sendPort);

  // 4. Wait for the first message to come through our ReceivePort
  final result = await receivePort.first;
  print(result); // Outputs: [Message 1, Message 2, Message 3]

  // 5. Clean up the port when we are done
  receivePort.close();
}
---
The Classic Flutter Way: compute()
For years, the standard way to achieve quick parallelism in Flutter was the compute() function provided by Flutter's foundation library. It hides the boilerplate of manually spawning an isolate and setting up two-way communication ports.
import 'package:flutter/foundation.dart';
import 'dart:convert';

// 1. A top-level function that runs in the background
List<Message> parseMassiveJson(String jsonString) {
  final List<dynamic> parsed = jsonDecode(jsonString);
  return parsed.map((e) => Message.fromJson(e)).toList();
}

// 2. The function called by your UI
Future<void> loadChatHistory(String jsonPayload) async {
  // compute() spins up an isolate, runs the function, returns the result, and kills the isolate
  final messages = await compute(parseMassiveJson, jsonPayload);

  updateUI(messages);
}
---
The Modern Dart Way: Isolate.run()
In Dart 2.19, the language introduced Isolate.run(). Functionally, it is very similar to compute(), but it is part of pure Dart (dart:isolate) rather than being tied to the Flutter framework.
import 'dart:isolate';

Future<void> loadChatHistory(String jsonPayload) async {
  // Pass the heavy function and the data to a new Isolate directly
  final messages = await Isolate.run(() => parseMassiveJson(jsonPayload));

  updateUI(messages);
}
---
Scaling Up: Managing Isolate Pools with squadron
While Isolate.run() and compute() are incredibly convenient, they come with a hidden cost: Isolate startup time. Spinning up a new isolate takes memory and a few milliseconds of time. If your app is constantly triggering heavy background tasks, this can become a bottleneck.
This is where the squadron package shines. It handles worker pools, allowing you to instantiate worker isolates that stay alive in the background.
// A simplified conceptual example of Squadron in action
final pool = MyWorkerPool(concurrencySettings: ConcurrencySettings(maxWorkers: 4));

// Start the pool (spin up the isolates once)
await pool.start();

// Send tasks to the pool - these are distributed among the active workers
final result1 = await pool.processImage(image1);
final result2 = await pool.processImage(image2);
---
The Golden Rule
async / await / Future).
If you are working* (math, parsing, image processing): Use Parallelism.
* For one-off tasks, use Isolate.run() or compute().
* For continuous or high-frequency tasks, use a worker pool package like squadron.Understanding this distinction is the key difference between a Flutter app that feels “good enough” and one that feels truly native, responsive, and professional. Protect your main thread, offload your heavy lifting, and let your UI shine!
Loading…