
If you’ve been building Flutter apps for a while, you’ve likely run into the “spaghetti code” phase. It happens when your UI widgets are tightly coupled to your business logic, and your business logic is directly instantiating API clients and databases.
When you try to write a unit test or swap out a database, everything breaks.
The solution? Dependency Inversion and Dependency Injection (DI). In the Flutter ecosystem, the golden duo for handling this is get_it combined with injectable. Let’s break down what these concepts mean and how to implement them to write cleaner, scalable Flutter apps.
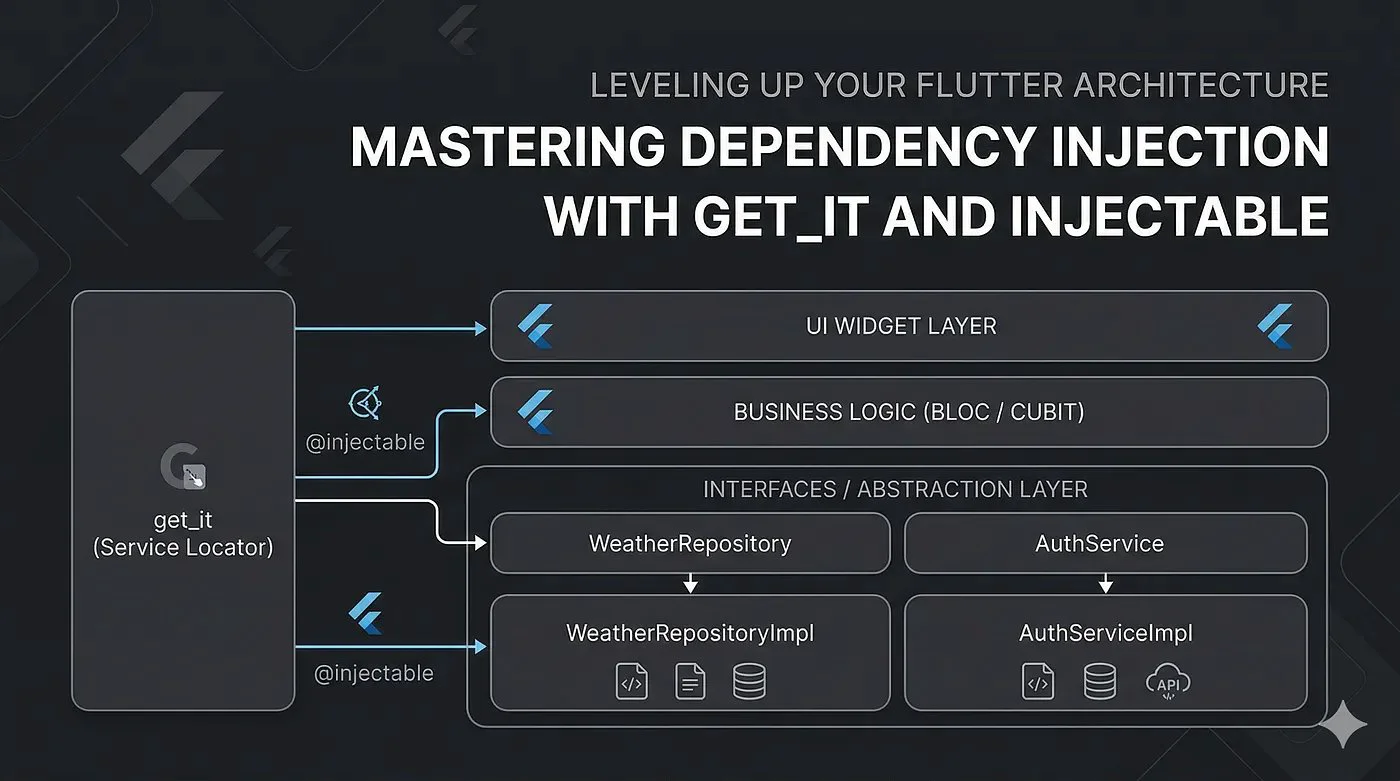
Table of Contents
---
🧠 The Theory: Dependency Inversion vs. Injection
Before diving into the code, let’s clear up the terminology. They sound similar, but they play different roles in the SOLID principles.
1. Dependency Inversion Principle (DIP)
The “D” in SOLID. It states two things:
FirebaseAuthService. Instead, let your UI depend on an abstract AuthService. This way, if you switch from Firebase to Supabase tomorrow, your UI doesn't need to change.2. Dependency Injection (DI)
DI is the technique used to achieve the Dependency Inversion Principle. Instead of a class creating its own dependencies (e.g., final api = ApiClient();), the dependency is "injected" into the class from the outside, usually via the constructor.
---
🛠 Enter the Heroes: get_it & injectable
While you can pass dependencies down the widget tree manually, it gets exhausting fast. This is where our Flutter packages come in.
get_it: A highly efficient Service Locator. It acts as a central registry where you can register your classes and request them from anywhere in your app without context.injectable: A code generator for get_it. Manually registering dozens of dependencies in get_it creates a massive, messy setup file. injectable allows you to use simple annotations (@injectable, @singleton) on your classes, and it writes the get_it boilerplate for you!---
🚀 Step-by-Step Implementation
Let’s build a simple example: An app that fetches weather data. We want our UI to rely on an abstraction (WeatherRepository), and we want injectable to wire up the concrete implementation (WeatherRepositoryImpl).
Step 1: Add Dependencies
Add the following to your pubspec.yaml:
dependencies:
  get_it: ^7.6.4
  injectable: ^2.3.2

dev_dependencies:
  injectable_generator: ^2.4.1
  build_runner: ^2.4.6
Step 2: Create the Abstraction
Create an abstract class for your repository. This is what your high-level code (like Blocs, Providers, or ViewModels) will talk to.
// weather_repository.dart
abstract class WeatherRepository {
  Future<String> getCurrentWeather(String city);
}
Step 3: Create the Concrete Implementation
Now, create the actual implementation. Here is where the magic of injectable happens. We use the @LazySingleton annotation and tell it to bind to the abstract WeatherRepository.
// weather_repository_impl.dart
import 'package:injectable/injectable.dart';
import 'weather_repository.dart';

@LazySingleton(as: WeatherRepository)
class WeatherRepositoryImpl implements WeatherRepository {

  // If this class had dependencies (like a network client),
  // you would inject them via the constructor here!

  @override
  Future<String> getCurrentWeather(String city) async {
    // Imagine an API call here
    await Future.delayed(const Duration(seconds: 1));
    return "Sunny and 25°C in $city";
  }
}
Step 4: Setup the Injection Configuration
Create a file named injection.dart. This is the entry point for get_it and injectable.
// injection.dart
import 'package:get_it/get_it.dart';
import 'package:injectable/injectable.dart';
import 'injection.config.dart'; // This file will be generated

final getIt = GetIt.instance;

@InjectableInit(
  initializerName: 'init', // default
  preferRelativeImports: true, // default
  asExtension: true, // default
)
void configureDependencies() => getIt.init();
Step 5: Run the Build Runner
Now, tell Flutter to generate the wiring code. Run this command in your terminal:
dart run build_runner build --delete-conflicting-outputs
watch instead of build if you want it to auto-generate every time you save a file.Step 6: Initialize and Use!
Finally, initialize your dependencies in main.dart before running the app.
// main.dart
import 'package:flutter/material.dart';
import 'injection.dart';

void main() {
  // Initialize dependencies
  configureDependencies();
  runApp(const MyApp());
}
Now, anywhere in your app (like inside a Cubit, a Bloc, or even directly in a widget), you can retrieve your dependency like this:
// Fetching the dependency via the abstraction!
final weatherRepo = getIt<WeatherRepository>();

// Use it
final weather = await weatherRepo.getCurrentWeather('Tokyo');
---
🎯 Why is this approach so powerful?
injectable handles all the getIt.registerLazySingleton<WeatherRepository>(() => WeatherRepositoryImpl()); code for you.WeatherRepository and register the mock in get_it. Your business logic won't know the difference.---
Wrapping Up
Mastering get_it and injectable might take an hour or two to fully wrap your head around, but it pays dividends for the lifetime of your project. It forces you to think in abstractions, making your codebase modular, testable, and highly professional.
Happy coding! 🚀
Loading…