
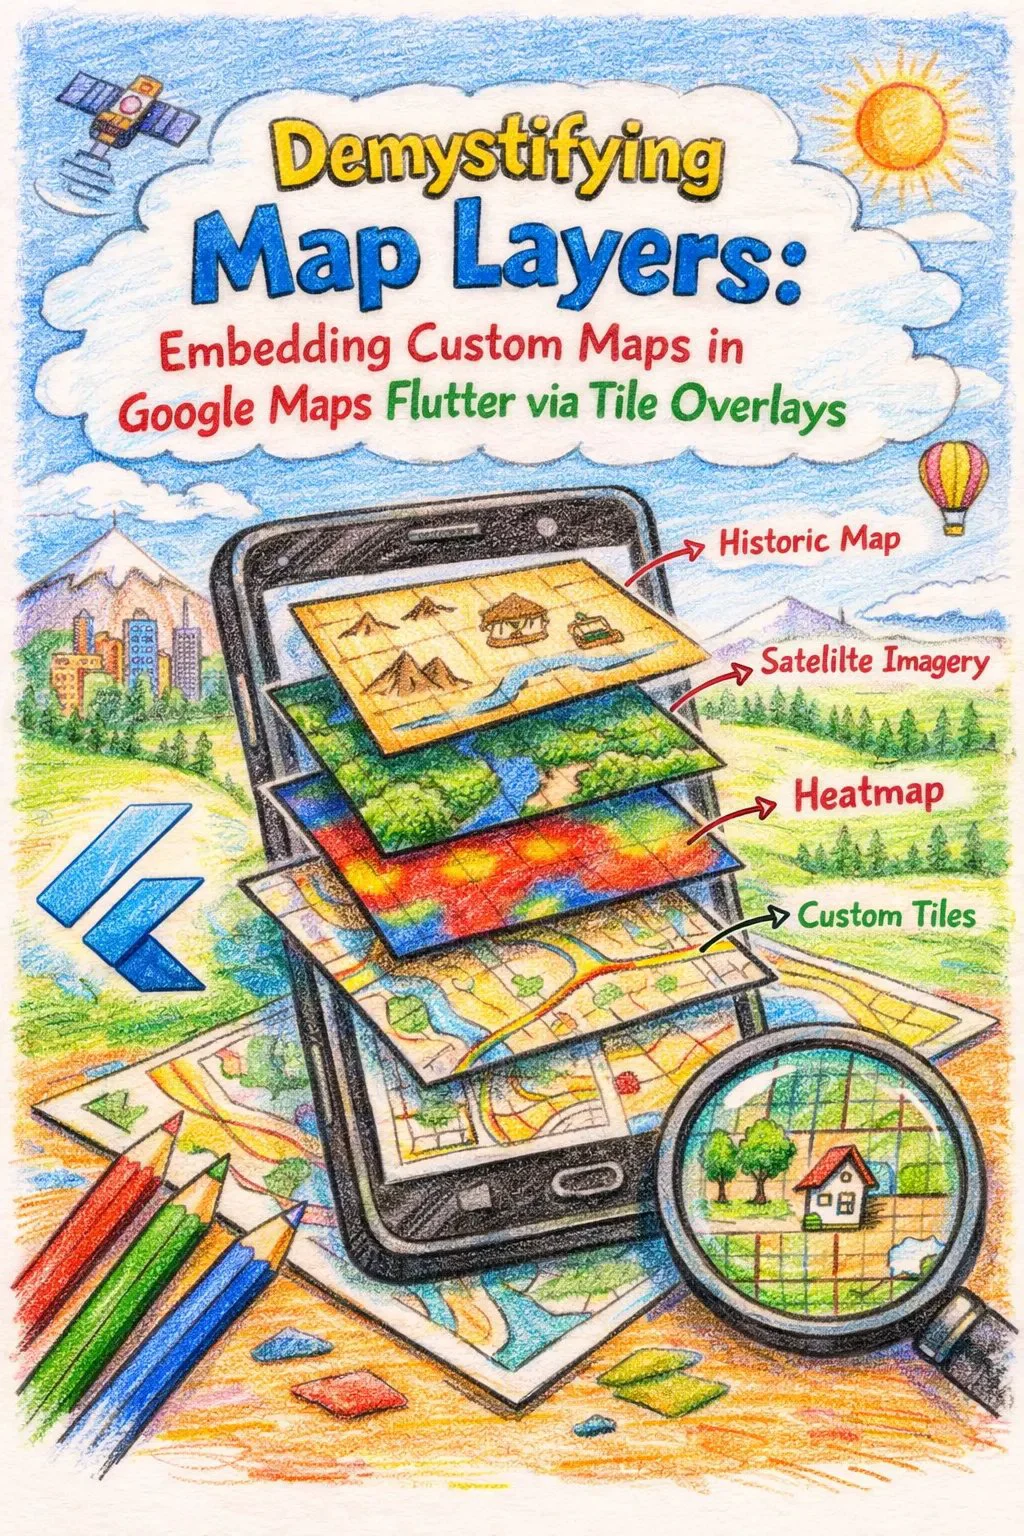
Khi xây dựng các ứng dụng dựa trên vị trí, base layer Google Maps tiêu chuẩn đôi khi không đủ dùng. Dù bạn đang xây dựng hệ thống điều hướng trong nhà cho một trung tâm thương mại khổng lồ, overlay dữ liệu radar thời tiết thời gian thực, hay render một custom fantasy map hoàn chỉnh — đến lúc nào đó bạn cũng cần tự tay kiểm soát phần bản đồ.
Trong Flutter, cách hiệu quả nhất để làm điều này là sử dụng Tile Overlays.
Trong bài viết này, chúng ta sẽ phân tích chi tiết cách Tile Overlays hoạt động và triển khai một TileProvider tùy chỉnh, sẵn sàng cho production trong Flutter.
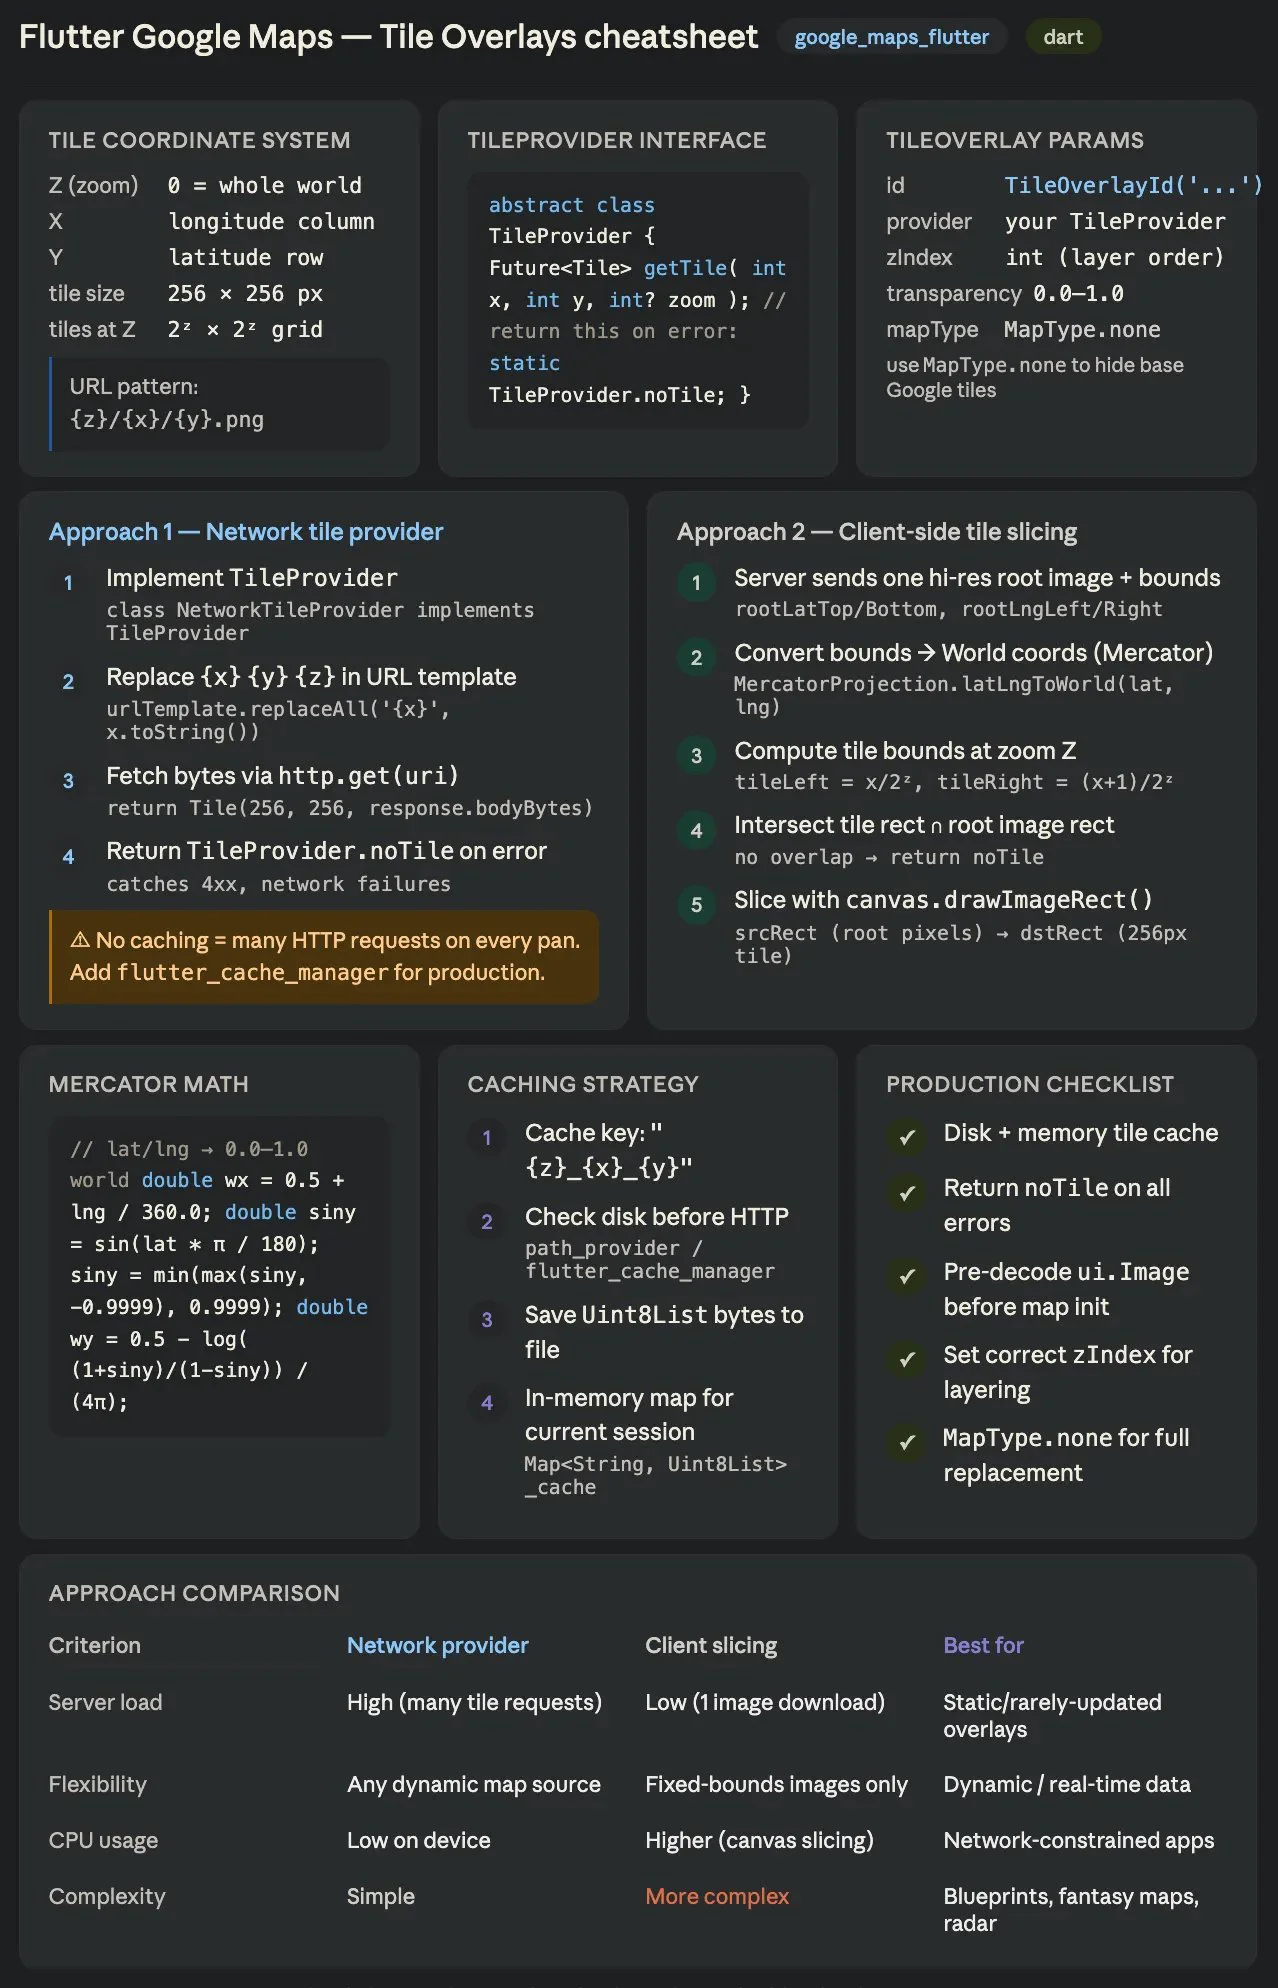
Hiểu Hệ Thống Map Tile (X, Y, Z)
Trước khi viết bất kỳ dòng Dart nào, điều quan trọng là phải hiểu cách các mapping engine render thế giới. Google Maps, cũng như hầu hết các web map hiện đại, sử dụng Web Mercator projection.
Thay vì tải một ảnh khổng lồ, độ phân giải cao của toàn bộ địa cầu, bản đồ được chia nhỏ thành một lưới các ảnh vuông nhỏ hơn (thường là 256x256 pixels) gọi là tiles.
Bản đồ yêu cầu các tile này dựa trên ba coordinate:
URL của một tile server tiêu chuẩn thường trông giống như thế này: https://your-custom-map-server.com/{z}/{x}/{y}.png
Step 1: Tạo Custom TileProvider
Package Maps_flutter cung cấp class TileOverlay, cần có một TileProvider. Trách nhiệm duy nhất của provider là nhận các coordinate X, Y, Z và trả về một object Tile chứa các byte ảnh.
Hãy cùng xây dựng một NetworkTileProvider để fetch tile từ một remote URL. Chúng ta cũng sẽ thêm error handling cơ bản để đảm bảo map không crash nếu một tile cụ thể không tải được — đây là vấn đề thường gặp khi làm việc với custom map server.
import 'dart:typed_data';
import 'package:flutter/services.dart';
import 'package:google_maps_flutter/google_maps_flutter.dart';
import 'package:http/http.dart' as http;
class NetworkTileProvider implements TileProvider {
  final String urlTemplate;

  NetworkTileProvider({required this.urlTemplate});
  @override
  Future<Tile> getTile(int x, int y, int? zoom) async {
    // Replace the placeholders with the actual coordinates
    final String url = urlTemplate
        .replaceAll('{x}', x.toString())
        .replaceAll('{y}', y.toString())
        .replaceAll('{z}', zoom.toString());
    try {
      final uri = Uri.parse(url);
      final response = await http.get(uri);
      if (response.statusCode == 200) {
        final Uint8List bytes = response.bodyBytes;
        // 256x256 is the standard tile size for Google Maps
        return Tile(256, 256, bytes);
      } else {
        // Return an empty tile if the server responds with an error (e.g., 404)
        return TileProvider.noTile;
      }
    } catch (e) {
      // Handle network errors gracefully
      print('Error loading tile $url: $e');
      return TileProvider.noTile;
    }
  }
}
Step 2: Kết Nối với Widget GoogleMap
Giờ ta đã có provider, ta có thể tạo một TileOverlay và inject nó vào map.
Nếu bạn thay thế hoàn toàn base map (ví dụ, hiển thị một custom game map hoặc một layout tùy chỉnh có style mạnh), bạn nên set mapType thành MapType.none để các đường xá và nhãn mặc định của Google không bị lọt qua các tile tùy chỉnh của bạn.
import 'package:flutter/material.dart';
import 'package:google_maps_flutter/google_maps_flutter.dart';
class CustomMapScreen extends StatefulWidget {
  const CustomMapScreen({Key? key}) : super(key: key);
  @override
  State<CustomMapScreen> createState() => _CustomMapScreenState();
}
class _CustomMapScreenState extends State<CustomMapScreen> {
  late Set<TileOverlay> _tileOverlays;
  @override
  void initState() {
    super.initState();
    _initTileOverlay();
  }
  void _initTileOverlay() {
    // Example using OpenStreetMap tiles (replace with your custom server)
    final String templateUrl = 'https://tile.openstreetmap.org/{z}/{x}/{y}.png';

    final TileOverlay customTileOverlay = TileOverlay(
      tileOverlayId: const TileOverlayId('custom_map_layer'),
      tileProvider: NetworkTileProvider(urlTemplate: templateUrl),
      // Set zIndex higher than 0 if layering on top of the standard Google Map
      zIndex: 1,
      // Set to true to make the layer completely opaque
      transparency: 0.0,
    );
    setState(() {
      _tileOverlays = {customTileOverlay};
    });
  }
  @override
  Widget build(BuildContext context) {
    return Scaffold(
      appBar: AppBar(
        title: const Text('Custom Tile Overlay'),
      ),
      body: GoogleMap(
        initialCameraPosition: const CameraPosition(
          target: LatLng(10.762622, 106.660172), // Coordinates for Ho Chi Minh City
          zoom: 13.0,
        ),
        // Use MapType.none if your tiles replace the base map completely
        mapType: MapType.normal,
        tileOverlays: _tileOverlays,
        onMapCreated: (GoogleMapController controller) {
          // Handle map creation
        },
      ),
    );
  }
}
Step 3: Production Considerations (Caching)
Nếu bạn sử dụng NetworkTileProvider cơ bản trên trong một ứng dụng production, bạn sẽ sớm nhận ra vấn đề về hiệu năng và lượng network usage cao. Mỗi khi người dùng pan map, hàng chục HTTP request được bắn đi.
Để đạt chuẩn production, bạn phải triển khai cơ chế caching. Bạn có thể chặn request getTile và kiểm tra file system cục bộ (dùng package như path_provider hoặc flutter_cache_manager) trước khi thực hiện lệnh gọi HTTP.
Bằng cách hash chuỗi {z}_{x}_{y} làm cache key, bạn có thể lưu các byte Uint8List xuống local. Khi người dùng quay lại một khu vực họ đã xem trước đó, các tile sẽ load tức thì từ disk, cải thiện UX đáng kể và tiết kiệm băng thông server.
Chiến Lược Overlay Nâng Cao: Client-Side Tile Slicing
Trong cách triển khai trước, client yêu cầu một ảnh 256x256 đã được render sẵn cho mỗi coordinate X, Y, Z. Tuy đơn giản, cách này làm server của bạn phải xử lý hàng trăm micro-request khi người dùng pan qua map.
Nếu custom overlay của bạn là tĩnh (như một bản thiết kế lớn, một fantasy map, hay một snapshot radar thời tiết high-res), có một kiến trúc hiệu quả hơn nhiều:
1. _Server_ cung cấp một ảnh "root" đơn lẻ, độ phân giải cao và các geographic bounds của nó (Lat/Lng góc trên-trái và dưới-phải).
2. _Client_ tải ảnh root này một lần duy nhất.
3. _TileProvider_ tính toán bằng toán học xem phần nào của ảnh root tương ứng với tile {z}/{x}/{y} được yêu cầu, crop nó trong memory và đưa cho Google Map.
Đây là cách tính toán chính xác vị trí pixel và slice tile natively trong Flutter.
Step 1: Toán Học Web Mercator Projection
Latitude và longitude là spherical coordinate, nhưng ảnh là hình chữ nhật phẳng. Để ánh xạ một cái sang cái kia, chúng ta phải normalize các coordinate thành không gian "World Coordinate" phẳng từ 0.0 đến 1.0 bằng Web Mercator projection.
Đầu tiên, hãy tạo một helper class để chuyển đổi Latitude và Longitude sang normalized World Coordinates.
import 'dart:math';
import 'dart:ui' as ui;
class MercatorProjection {
  static const double pi = 3.1415926535897932;
  /// Converts a Lat/Lng to a normalized World Coordinate (0.0 to 1.0)
  static ui.Offset latLngToWorld(double lat, double lng) {
    double siny = sin(lat * pi / 180.0);
    // Truncate to prevent infinity at the extreme poles
    siny = min(max(siny, -0.9999), 0.9999);

    return ui.Offset(
      0.5 + lng / 360.0,
      0.5 - log((1.0 + siny) / (1.0 - siny)) / (4.0 * pi),
    );
  }
}
Step 2: TileProvider Slicing
Bây giờ hãy xây dựng ClientSlicingTileProvider.
Logic ở đây phụ thuộc nhiều vào bounding box intersection. Chúng ta cần xác định bounding box của tile được yêu cầu (x, y, z) trong World Coordinates và so sánh với bounding box của ảnh Root.
Nếu chúng giao nhau, ta dùng canvas.drawImageRect() để trích xuất chính xác các pixel từ ảnh Root và vẽ chúng lên một file 256x256 transparent chuẩn.
import 'dart:typed_data';
import 'dart:ui' as ui;
import 'package:flutter/material.dart';
import 'package:google_maps_flutter/google_maps_flutter.dart';
class ClientSlicingTileProvider implements TileProvider {
  final ui.Image rootImage;

  // The geographic boundaries of your root image
  final double rootLatTop;
  final double rootLngLeft;
  final double rootLatBottom;
  final double rootLngRight;
  ClientSlicingTileProvider({
    required this.rootImage,
    required this.rootLatTop,
    required this.rootLngLeft,
    required this.rootLatBottom,
    required this.rootLngRight,
  });
  @override
  Future<Tile> getTile(int x, int y, int? zoom) async {
    if (zoom == null) return TileProvider.noTile;
    // 1. Calculate Root Image bounds in World Coordinates (0.0 - 1.0)
    final rootTL = MercatorProjection.latLngToWorld(rootLatTop, rootLngLeft);
    final rootBR = MercatorProjection.latLngToWorld(rootLatBottom, rootLngRight);
    final rootWorldLeft = rootTL.dx;
    final rootWorldTop = rootTL.dy;
    final rootWorldRight = rootBR.dx;
    final rootWorldBottom = rootBR.dy;
    // 2. Calculate requested Tile bounds in World Coordinates
    final double n = pow(2, zoom).toDouble();
    final double tileWorldLeft = x / n;
    final double tileWorldTop = y / n;
    final double tileWorldRight = (x + 1) / n;
    final double tileWorldBottom = (y + 1) / n;
    // 3. Find the Intersection between the Tile and the Root Image
    final double intersectLeft = max(tileWorldLeft, rootWorldLeft);
    final double intersectTop = max(tileWorldTop, rootWorldTop);
    final double intersectRight = min(tileWorldRight, rootWorldRight);
    final double intersectBottom = min(tileWorldBottom, rootWorldBottom);
    // If there is no overlap, this tile is outside our custom map area
    if (intersectLeft >= intersectRight || intersectTop >= intersectBottom) {
      return TileProvider.noTile;
    }
    // 4. Map the intersection back to Root Image Pixels (Source Rect)
    final double rootWorldWidth = rootWorldRight - rootWorldLeft;
    final double rootWorldHeight = rootWorldBottom - rootWorldTop;
    final Rect srcRect = Rect.fromLTRB(
      (intersectLeft - rootWorldLeft) / rootWorldWidth * rootImage.width,
      (intersectTop - rootWorldTop) / rootWorldHeight * rootImage.height,
      (intersectRight - rootWorldLeft) / rootWorldWidth * rootImage.width,
      (intersectBottom - rootWorldTop) / rootWorldHeight * rootImage.height,
    );
    // 5. Map the intersection to the 256x256 Tile Pixels (Destination Rect)
    final double tileWorldWidth = tileWorldRight - tileWorldLeft;
    final double tileWorldHeight = tileWorldBottom - tileWorldTop;
    final Rect dstRect = Rect.fromLTRB(
      (intersectLeft - tileWorldLeft) / tileWorldWidth * 256,
      (intersectTop - tileWorldTop) / tileWorldHeight * 256,
      (intersectRight - tileWorldLeft) / tileWorldWidth * 256,
      (intersectBottom - tileWorldTop) / tileWorldHeight * 256,
    );
    // 6. Paint the sliced portion onto a new Canvas
    final recorder = ui.PictureRecorder();
    final canvas = Canvas(recorder);

    // Optional: Add a transparent background if your image has gaps
    final paint = Paint()..filterQuality = FilterQuality.high;

    canvas.drawImageRect(rootImage, srcRect, dstRect, paint);
    // 7. Convert the Canvas back to bytes for Google Maps
    final picture = recorder.endRecording();
    final image = await picture.toImage(256, 256);
    final byteData = await image.toByteData(format: ui.ImageByteFormat.png);
    if (byteData != null) {
      return Tile(256, 256, byteData.buffer.asUint8List());
    }
    return TileProvider.noTile;
  }
}
Production Considerations cho Slicing
Tuy toán học này giải quyết được overhead network, nó lại đưa ra một thách thức mới: Main Thread Blocking.
Chuyển đổi ui.Image sang PNG bytes bằng toByteData(format: ui.ImageByteFormat.png) đòi hỏi serialization. Nếu người dùng zoom out nhanh, map có thể yêu cầu hàng chục tile cùng lúc, điều này có thể gây ra micro-stutters ở UI layer.
Để tối ưu cho môi trường production:
ui.Image: Đảm bảo ảnh root đã được decode hoàn toàn vào memory trước khi khởi tạo map.Map<String, Uint8List> đơn giản cho các tile đã được slice trong session hiện tại, để bạn không phải re-calculate và re-encode lại các byte giống nhau mỗi khi người dùng pan qua pan lại.Bằng cách chuyển phần xử lý nặng từ các cloud server về CPU local của thiết bị, bạn cắt giảm đáng kể chi phí backend trong khi mang lại trải nghiệm custom map mượt mà, tải tức thì.
Kết Luận
Tích hợp Tile Overlays vào Google Maps cho phép bạn thoát khỏi các thiết kế map chuẩn và overlay bất kỳ dữ liệu không gian nào bạn cần. Bằng cách hiểu Web Mercator grid và xây dựng một TileProvider vững chắc, bạn có thể hòa hợp bản đồ tùy chỉnh của mình một cách liền mạch với các tương tác mạnh mẽ mà package Maps_flutter cung cấp.
Happy coding : )

Loading…