
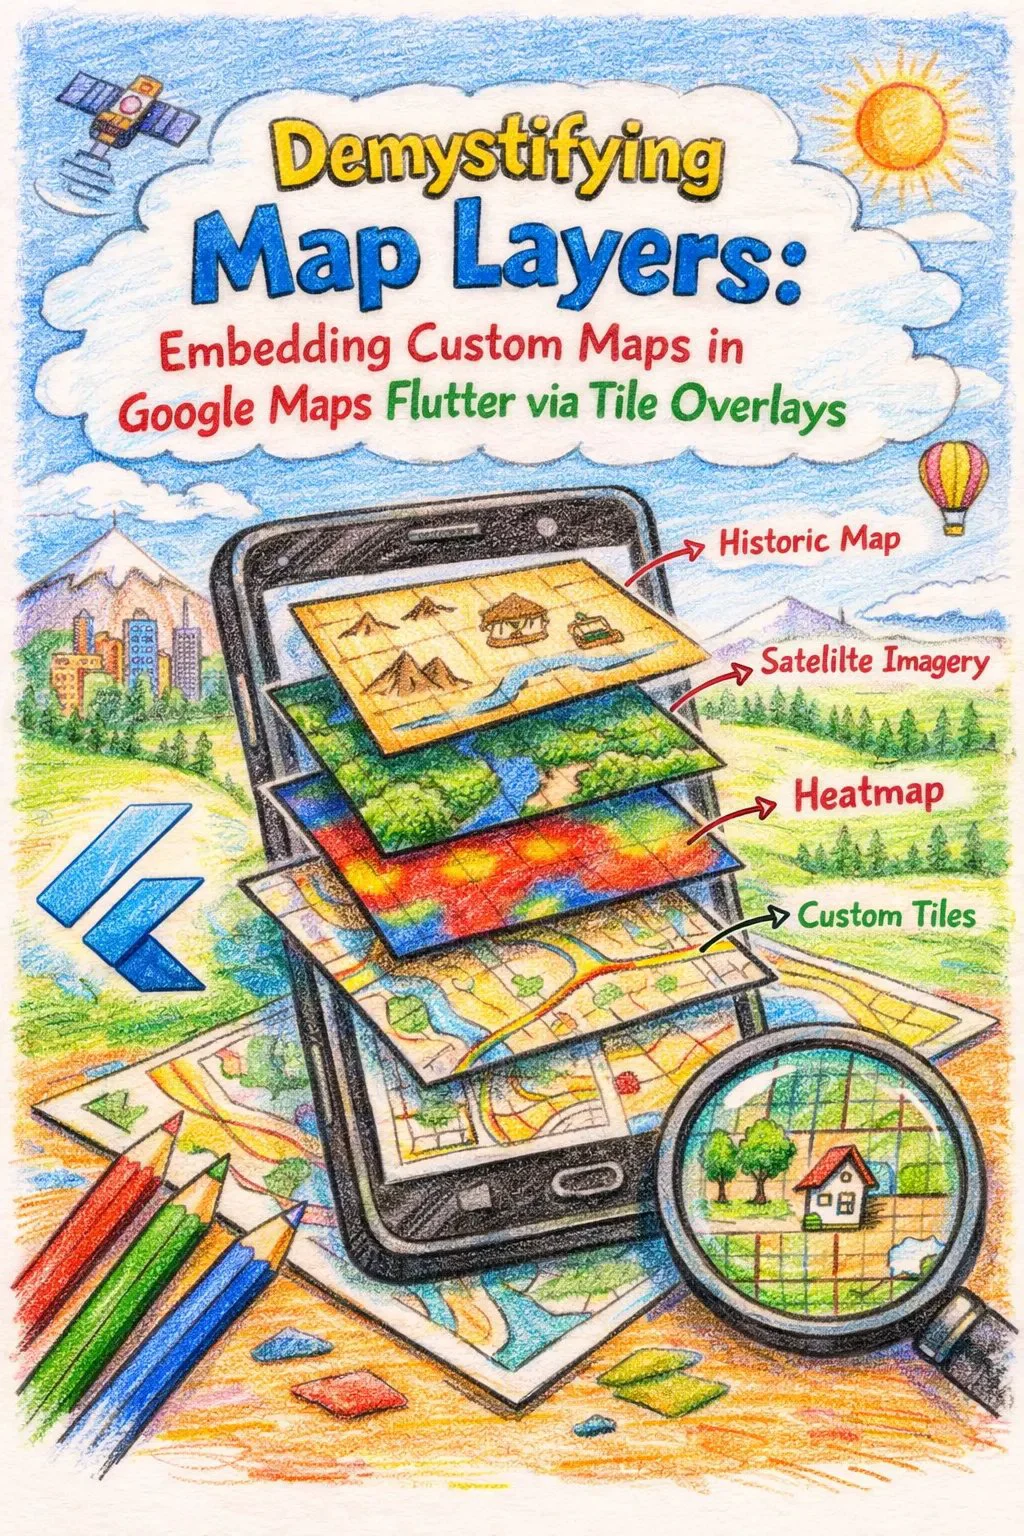
When building location-based applications, the standard Google Maps base layer isn’t always enough. Whether you are building an indoor navigation system for a massive shopping mall, overlaying real-time weather radar data, or rendering a complete custom fantasy map, you eventually need to take control of the cartography.
In Flutter, the most efficient way to achieve this is by using Tile Overlays.
In this article, we will break down exactly how Tile Overlays work and implement a custom, production-ready TileProvider in Flutter.
Understanding the Map Tile System (X, Y, Z)
Before writing any Dart code, it is crucial to understand how mapping engines render the world. Google Maps, like almost all modern web maps, uses the Web Mercator projection.
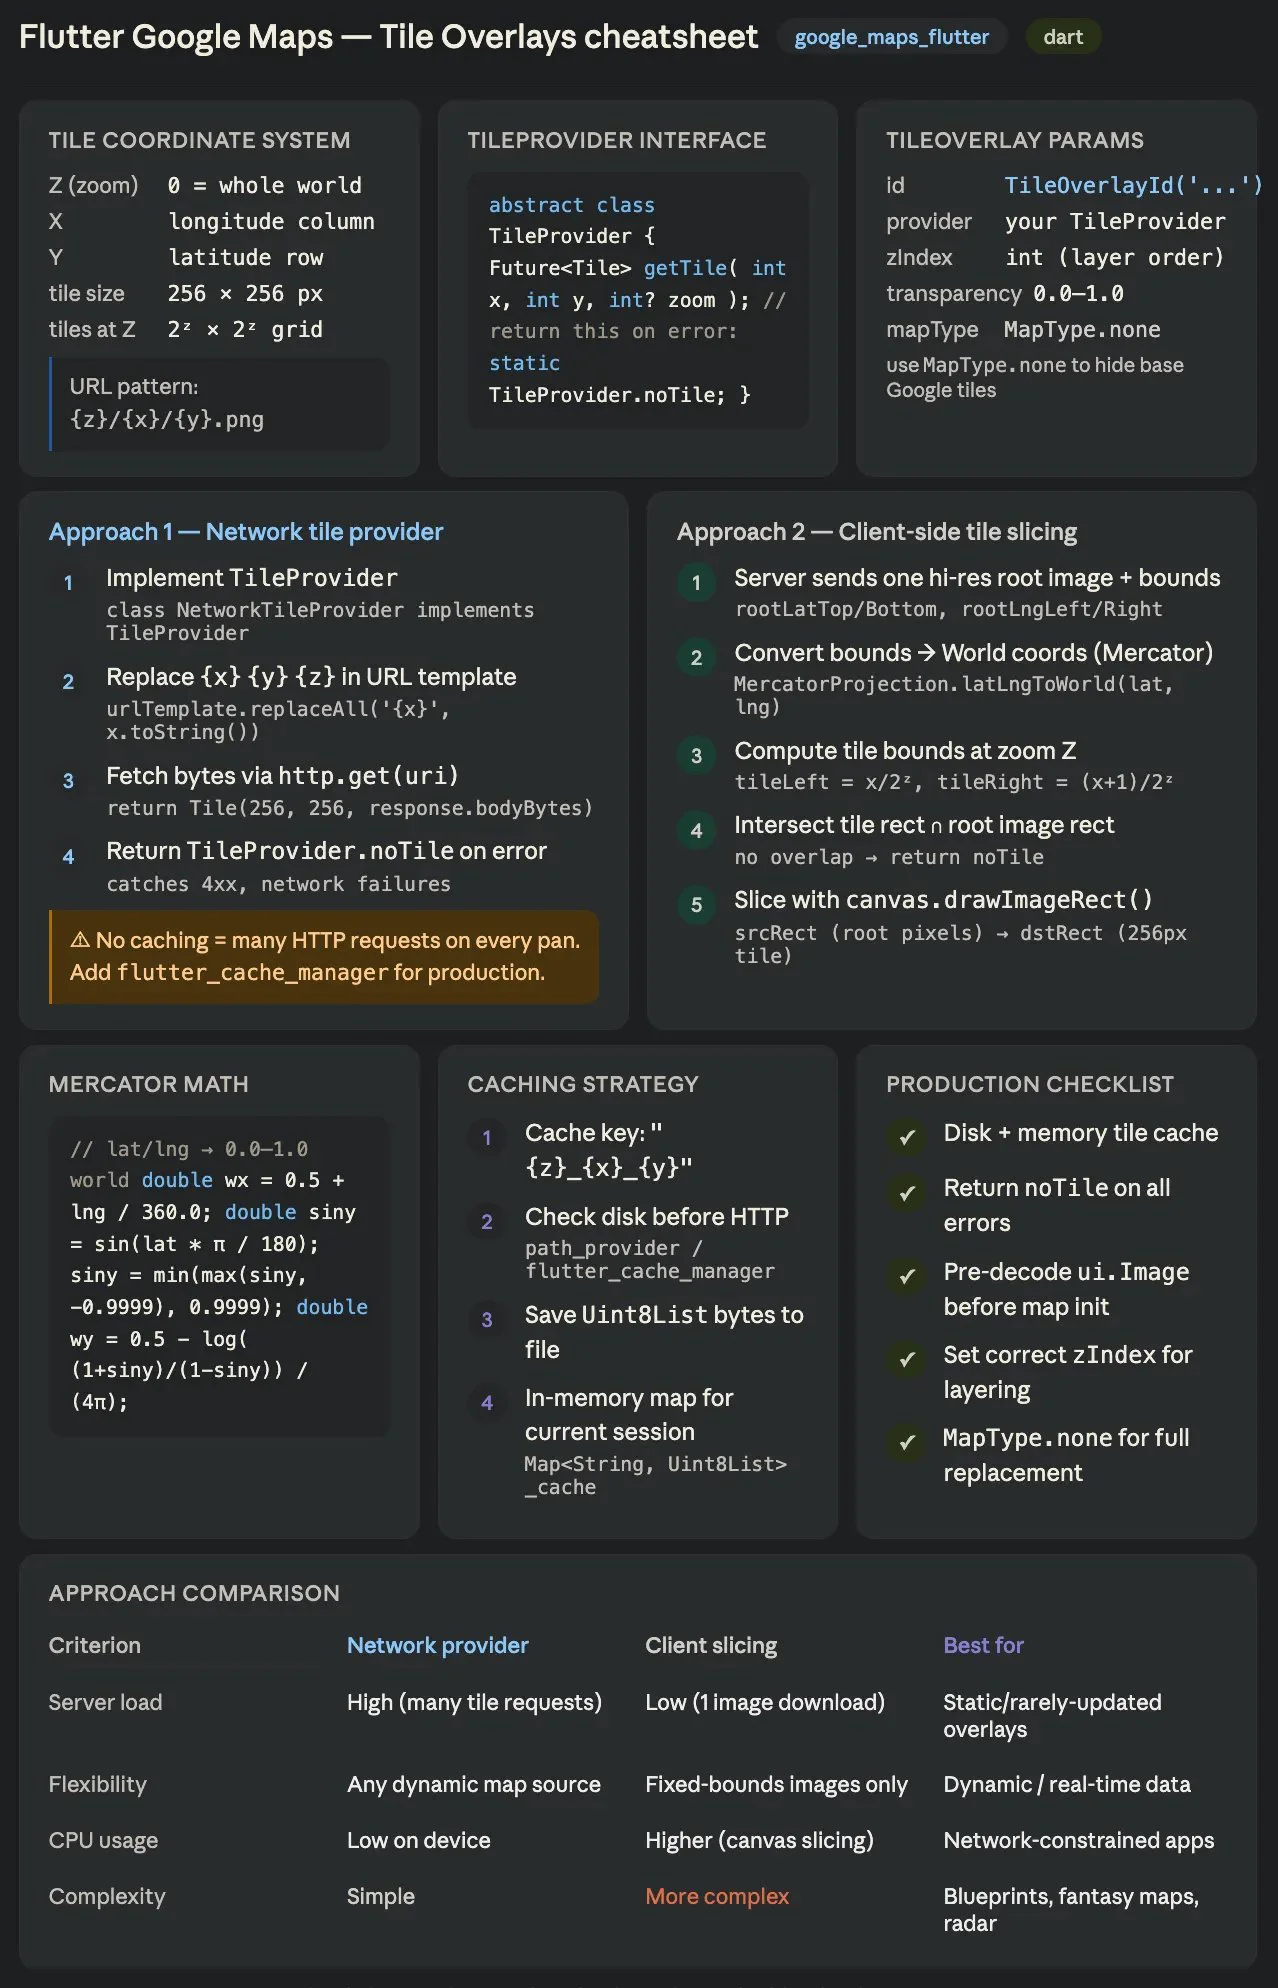
Instead of loading one massive, high-resolution image of the entire globe, the map is broken down into a grid of smaller square images (typically 256x256 pixels) called tiles.
The map requests these tiles based on three coordinates:
A standard tile server URL usually looks something like this: https://your-custom-map-server.com/{z}/{x}/{y}.png
Step 1: Creating a Custom TileProvider
The Maps_flutter package provides a TileOverlay class, which requires a TileProvider. The provider’s sole responsibility is to take the X, Y, and Z coordinates and return a Tile object containing the image bytes.
Let’s build a NetworkTileProvider that fetches tiles from a remote URL. We will also include basic error handling to ensure our map doesn’t crash if a specific tile fails to load, a common issue when dealing with custom map servers.
import 'dart:typed_data';
import 'package:flutter/services.dart';
import 'package:google_maps_flutter/google_maps_flutter.dart';
import 'package:http/http.dart' as http;
class NetworkTileProvider implements TileProvider {
  final String urlTemplate;

  NetworkTileProvider({required this.urlTemplate});
  @override
  Future<Tile> getTile(int x, int y, int? zoom) async {
    // Replace the placeholders with the actual coordinates
    final String url = urlTemplate
        .replaceAll('{x}', x.toString())
        .replaceAll('{y}', y.toString())
        .replaceAll('{z}', zoom.toString());
    try {
      final uri = Uri.parse(url);
      final response = await http.get(uri);
      if (response.statusCode == 200) {
        final Uint8List bytes = response.bodyBytes;
        // 256x256 is the standard tile size for Google Maps
        return Tile(256, 256, bytes);
      } else {
        // Return an empty tile if the server responds with an error (e.g., 404)
        return TileProvider.noTile;
      }
    } catch (e) {
      // Handle network errors gracefully
      print('Error loading tile $url: $e');
      return TileProvider.noTile;
    }
  }
}
Step 2: Wiring it up to the GoogleMap Widget
Now that we have our provider, we can create a TileOverlay and inject it into our map.
If you are replacing the base map entirely (for example, displaying a custom game map or highly stylized custom layout), you will want to set the mapType to MapType.none so Google’s default roads and labels don’t bleed through your custom tiles.
import 'package:flutter/material.dart';
import 'package:google_maps_flutter/google_maps_flutter.dart';
class CustomMapScreen extends StatefulWidget {
  const CustomMapScreen({Key? key}) : super(key: key);
  @override
  State<CustomMapScreen> createState() => _CustomMapScreenState();
}
class _CustomMapScreenState extends State<CustomMapScreen> {
  late Set<TileOverlay> _tileOverlays;
  @override
  void initState() {
    super.initState();
    _initTileOverlay();
  }
  void _initTileOverlay() {
    // Example using OpenStreetMap tiles (replace with your custom server)
    final String templateUrl = 'https://tile.openstreetmap.org/{z}/{x}/{y}.png';

    final TileOverlay customTileOverlay = TileOverlay(
      tileOverlayId: const TileOverlayId('custom_map_layer'),
      tileProvider: NetworkTileProvider(urlTemplate: templateUrl),
      // Set zIndex higher than 0 if layering on top of the standard Google Map
      zIndex: 1,
      // Set to true to make the layer completely opaque
      transparency: 0.0,
    );
    setState(() {
      _tileOverlays = {customTileOverlay};
    });
  }
  @override
  Widget build(BuildContext context) {
    return Scaffold(
      appBar: AppBar(
        title: const Text('Custom Tile Overlay'),
      ),
      body: GoogleMap(
        initialCameraPosition: const CameraPosition(
          target: LatLng(10.762622, 106.660172), // Coordinates for Ho Chi Minh City
          zoom: 13.0,
        ),
        // Use MapType.none if your tiles replace the base map completely
        mapType: MapType.normal,
        tileOverlays: _tileOverlays,
        onMapCreated: (GoogleMapController controller) {
          // Handle map creation
        },
      ),
    );
  }
}
Step 3: Production Considerations (Caching)
If you use the basic NetworkTileProvider above in a production application, you will quickly notice performance issues and high network usage. Every time the user pans the map, dozens of HTTP requests are fired off.
To make this production-ready, you must implement a caching mechanism. You can intercept the getTile request and check the local file system (using a package like path_provider or flutter_cache_manager) before making the HTTP call.
By hashing the {z}_{x}_{y} string as your cache key, you can save the Uint8List bytes locally. When the user scrolls back to an area they have already viewed, the tiles will load instantly from disk, drastically improving the UX and saving server bandwidth.
Advanced Overlay Strategies: Client-Side Tile Slicing
In our previous implementation, the client requested a pre-rendered 256x256 image for every single X, Y, Z coordinate. While simple, this approach hammers your server with hundreds of micro-requests as the user pans across the map.
If your custom overlay is static (like a large blueprint, a fantasy map, or a high-res weather radar snapshot), there is a much more efficient architecture:
1. _The Server_ provides a single, high-resolution “root” image and its geographic bounds (Top-Left and Bottom-Right Lat/Lng).
2. _The Client_ downloads this root image once.
3. _The TileProvider_ calculates mathematically which sub-section of the root image corresponds to the requested {z}/{x}/{y} tile, crops it in memory, and feeds it to the Google Map.
Here is how to calculate the exact pixel positions and slice the tiles natively in Flutter.
Step 1: The Web Mercator Projection Math
Latitude and longitude are spherical coordinates, but images are flat rectangles. To map one to the other, we must normalize the coordinates into a flat 0.0 to 1.0 “World Coordinate” space using the Web Mercator projection.
First, let’s create a helper class to convert Latitude and Longitude into normalized World Coordinates.
import 'dart:math';
import 'dart:ui' as ui;
class MercatorProjection {
  static const double pi = 3.1415926535897932;
  /// Converts a Lat/Lng to a normalized World Coordinate (0.0 to 1.0)
  static ui.Offset latLngToWorld(double lat, double lng) {
    double siny = sin(lat * pi / 180.0);
    // Truncate to prevent infinity at the extreme poles
    siny = min(max(siny, -0.9999), 0.9999);

    return ui.Offset(
      0.5 + lng / 360.0,
      0.5 - log((1.0 + siny) / (1.0 - siny)) / (4.0 * pi),
    );
  }
}
Step 2: The Slicing TileProvider
Now, let’s build the ClientSlicingTileProvider.
The logic here relies heavily on bounding box intersections. We need to determine the bounding box of the requested tile (x, y, z) in World Coordinates and compare it against the bounding box of our Root Image.
If they intersect, we use canvas.drawImageRect() to extract the exact pixels from the Root Image and draw them onto a standard 256x256 transparent file.
import 'dart:typed_data';
import 'dart:ui' as ui;
import 'package:flutter/material.dart';
import 'package:google_maps_flutter/google_maps_flutter.dart';
class ClientSlicingTileProvider implements TileProvider {
  final ui.Image rootImage;

  // The geographic boundaries of your root image
  final double rootLatTop;
  final double rootLngLeft;
  final double rootLatBottom;
  final double rootLngRight;
  ClientSlicingTileProvider({
    required this.rootImage,
    required this.rootLatTop,
    required this.rootLngLeft,
    required this.rootLatBottom,
    required this.rootLngRight,
  });
  @override
  Future<Tile> getTile(int x, int y, int? zoom) async {
    if (zoom == null) return TileProvider.noTile;
    // 1. Calculate Root Image bounds in World Coordinates (0.0 - 1.0)
    final rootTL = MercatorProjection.latLngToWorld(rootLatTop, rootLngLeft);
    final rootBR = MercatorProjection.latLngToWorld(rootLatBottom, rootLngRight);
    final rootWorldLeft = rootTL.dx;
    final rootWorldTop = rootTL.dy;
    final rootWorldRight = rootBR.dx;
    final rootWorldBottom = rootBR.dy;
    // 2. Calculate requested Tile bounds in World Coordinates
    final double n = pow(2, zoom).toDouble();
    final double tileWorldLeft = x / n;
    final double tileWorldTop = y / n;
    final double tileWorldRight = (x + 1) / n;
    final double tileWorldBottom = (y + 1) / n;
    // 3. Find the Intersection between the Tile and the Root Image
    final double intersectLeft = max(tileWorldLeft, rootWorldLeft);
    final double intersectTop = max(tileWorldTop, rootWorldTop);
    final double intersectRight = min(tileWorldRight, rootWorldRight);
    final double intersectBottom = min(tileWorldBottom, rootWorldBottom);
    // If there is no overlap, this tile is outside our custom map area
    if (intersectLeft >= intersectRight || intersectTop >= intersectBottom) {
      return TileProvider.noTile;
    }
    // 4. Map the intersection back to Root Image Pixels (Source Rect)
    final double rootWorldWidth = rootWorldRight - rootWorldLeft;
    final double rootWorldHeight = rootWorldBottom - rootWorldTop;
    final Rect srcRect = Rect.fromLTRB(
      (intersectLeft - rootWorldLeft) / rootWorldWidth * rootImage.width,
      (intersectTop - rootWorldTop) / rootWorldHeight * rootImage.height,
      (intersectRight - rootWorldLeft) / rootWorldWidth * rootImage.width,
      (intersectBottom - rootWorldTop) / rootWorldHeight * rootImage.height,
    );
    // 5. Map the intersection to the 256x256 Tile Pixels (Destination Rect)
    final double tileWorldWidth = tileWorldRight - tileWorldLeft;
    final double tileWorldHeight = tileWorldBottom - tileWorldTop;
    final Rect dstRect = Rect.fromLTRB(
      (intersectLeft - tileWorldLeft) / tileWorldWidth * 256,
      (intersectTop - tileWorldTop) / tileWorldHeight * 256,
      (intersectRight - tileWorldLeft) / tileWorldWidth * 256,
      (intersectBottom - tileWorldTop) / tileWorldHeight * 256,
    );
    // 6. Paint the sliced portion onto a new Canvas
    final recorder = ui.PictureRecorder();
    final canvas = Canvas(recorder);

    // Optional: Add a transparent background if your image has gaps
    final paint = Paint()..filterQuality = FilterQuality.high;

    canvas.drawImageRect(rootImage, srcRect, dstRect, paint);
    // 7. Convert the Canvas back to bytes for Google Maps
    final picture = recorder.endRecording();
    final image = await picture.toImage(256, 256);
    final byteData = await image.toByteData(format: ui.ImageByteFormat.png);
    if (byteData != null) {
      return Tile(256, 256, byteData.buffer.asUint8List());
    }
    return TileProvider.noTile;
  }
}
Production Considerations for Slicing
While this math solves the network overhead, it introduces a new challenge: Main Thread Blocking.
Converting ui.Image to PNG bytes using toByteData(format: ui.ImageByteFormat.png) requires serialization. If the user zooms out quickly, the map might request dozens of tiles simultaneously, which can cause micro-stutters in the UI layer.
To optimize this for a production environment:
ui.Image: Ensure the root image is fully decoded into memory before initializing the map.Map<String, Uint8List> for tiles that have already been sliced during the current session, so you don't re-calculate and re-encode the same bytes repeatedly when the user pans back and forth.By shifting the heavy lifting from your cloud servers to the device’s local CPU, you drastically cut down your backend costs while providing a seamless, instant-loading custom map experience.
Conclusion
Integrating Tile Overlays into Google Maps allows you to break free from standard map designs and overlay any spatial data you need. By understanding the Web Mercator grid and building a robust TileProvider, you can seamlessly fuse your custom cartography with the powerful interactions provided by the Maps_flutter package.
Happy coding : )

Loading…