
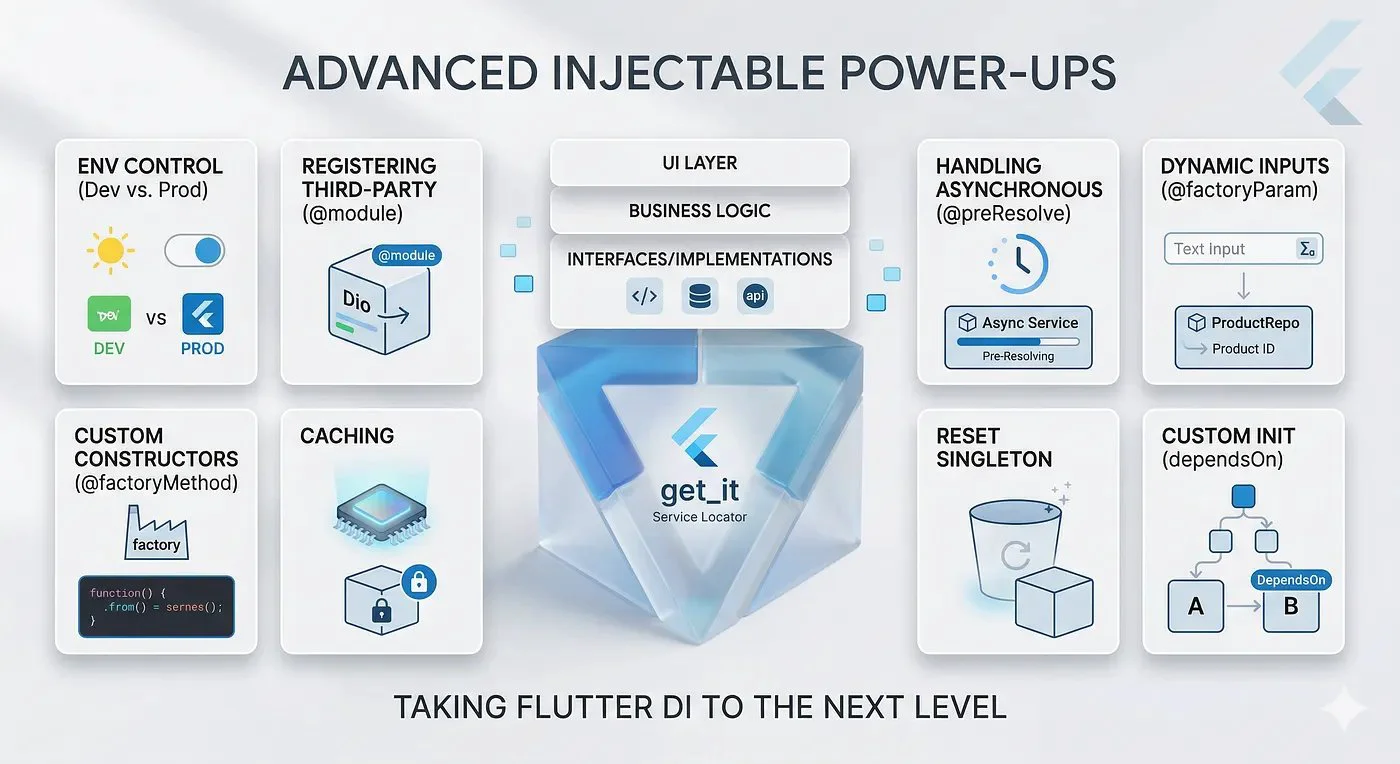
Khi bạn đã nắm vững những kiến thức cơ bản, injectable còn cung cấp nhiều tính năng nâng cao để quản lý các kiến trúc ứng dụng phức tạp trong thực tế. Dưới đây là bảy kỹ thuật thiết yếu cần thành thạo:
Mục lục
---
1. Environments (Dev vs. Prod)
Trong một ứng dụng chuyên nghiệp, bạn hiếm khi dùng chung database hay API endpoints cho môi trường development và production. injectable xử lý điều này rất gọn với annotation @Environment.
Bạn có thể tạo nhiều implementations khác nhau cho WeatherRepository và gắn tag cho chúng:
const dev = Environment('dev');
const prod = Environment('prod');

// The Mock/Dev implementation
@LazySingleton(as: WeatherRepository, env: [dev])
class DevWeatherRepositoryImpl implements WeatherRepository {
  @override
  Future<String> getCurrentWeather(String city) async {
    return "Mock Weather: 20°C in $city";
  }
}

// The Real/Prod implementation
@LazySingleton(as: WeatherRepository, env: [prod])
class ProdWeatherRepositoryImpl implements WeatherRepository {
  final ApiClient _apiClient; // Injected dependency

  ProdWeatherRepositoryImpl(this._apiClient);

  @override
  Future<String> getCurrentWeather(String city) async {
    return await _apiClient.fetchWeather(city);
  }
}
Khi khởi tạo get_it, chỉ cần truyền vào environment bạn muốn chạy:
// Run the dev environment
configureDependencies(environment: dev.name);
---
2. Đăng ký third-party types với @module
Bạn có thể dễ dàng annotate các class của mình với @injectable, nhưng còn các third-party packages như Dio hay SharedPreferences thì sao? Bạn không có quyền chỉnh sửa source code của chúng, nên không thể thêm annotation vào đó được.
Để giải quyết vấn đề này, hãy dùng Module. Một module là một abstract class nơi bạn định nghĩa các getter hoặc method trả về các instance của third-party.
@module
abstract class RegisterModule {
  // Registering a simple third-party package
  @lazySingleton
  Dio get dio => Dio(BaseOptions(baseUrl: 'https://api.weather.com'));
}
Giờ đây, injectable biết cách cung cấp Dio bất cứ khi nào một class nào đó yêu cầu nó trong constructor!
---
3. Xử lý asynchronous dependencies (@preResolve)
Đôi khi, việc khởi tạo một dependency lại tốn thời gian. Ví dụ điển hình là SharedPreferences.getInstance(), vốn trả về một Future. Bạn không thể inject một Future vào một class đang chờ nhận instance đồng bộ.
Hãy dùng annotation @preResolve bên trong module của bạn:
@module
abstract class RegisterModule {
  @preResolve
  Future<SharedPreferences> get prefs => SharedPreferences.getInstance();
}
Khi dùng @preResolve, bạn cũng phải await quá trình khởi tạo get_it trong main.dart:
void main() async {
  WidgetsFlutterBinding.ensureInitialized();

  // Await the setup!
  await configureDependencies();

  runApp(const MyApp());
}
Giờ bạn có thể inject SharedPreferences trực tiếp vào các repository hoặc local storage class mà không cần lo lắng về Futures hay các vấn đề async initialization.
---
4. Dynamic inputs với @factoryParam
Đôi khi bạn không thể inject mọi thứ ngay lúc khởi động. Điều gì xảy ra nếu ProductDetailsBloc của bạn cần một productId cụ thể mà bạn chỉ có được khi người dùng nhấn vào một mục trong danh sách? Bạn có thể truyền các runtime parameters trực tiếp vào các class được inject bằng @factoryParam.
@injectable
class ProductDetailsBloc {
  final ProductRepository repository;
  final String productId;

  // Tell injectable that productId will be provided at runtime
  ProductDetailsBloc(
    this.repository,
    @factoryParam this.productId,
  );
}
Khi cần Bloc, chỉ cần truyền parameter qua get_it:
// The repository is injected automatically, but you provide the ID!
final bloc = getIt<ProductDetailsBloc>(param1: 'item_12345');
get_it hỗ trợ tối đa hai factory parameters: param1 và param2.---
5. Custom constructors với @factoryMethod
Mặc định, injectable sẽ nhìn vào default constructor của bạn để resolve dependencies. Nhưng nếu bạn đang dùng một named constructor (như .from()) hay một static create method thì sao? Chỉ cần annotate nó với @factoryMethod.
@injectable
class ApiClient {
  final String baseUrl;

  ApiClient._internal(this.baseUrl);

  // Injectable will use this specific method to create the instance
  @factoryMethod
  static ApiClient create(ConfigService config) {
    return ApiClient._internal(config.getBaseUrl());
  }
}
---
6. Caching và reset lazy singletons
Singleton hoạt động như một in-memory cache cho ứng dụng của bạn. Nhưng điều gì xảy ra khi người dùng đăng xuất? Bạn không muốn người dùng tiếp theo thấy dữ liệu profile đã được cache từ người dùng trước.
Bạn có thể định nghĩa một quá trình dọn dẹp bằng @disposeMethod.
@LazySingleton()
class UserProfileCache {
  Map<String, dynamic>? userData;

  @disposeMethod
  void dispose() {
    userData = null; // Clear the cache
    print("Cache cleared!");
  }
}
Khi người dùng đăng xuất, bạn chỉ cần báo cho get_it reset singleton cụ thể đó. Nó sẽ tự động gọi @disposeMethod và xóa instance. Lần tiếp theo bạn yêu cầu UserProfileCache, get_it sẽ tạo một instance mới hoàn toàn!
// Call this on logout
getIt.resetLazySingleton<UserProfileCache>();
---
7. Tùy chỉnh thứ tự khởi tạo (dependsOn)
Thông thường, injectable đủ thông minh để tự xác định dependency nào cần được khởi tạo trước bằng cách duyệt qua cây constructor. Tuy nhiên, nếu bạn có các asynchronous singleton phụ thuộc vào side effects, bạn có thể cần ép buộc một thứ tự khởi tạo nghiêm ngặt.
Dùng property dependsOn để nói với injectable: "Đừng tạo Class B cho đến khi Class A được khởi tạo xong."
@singleton
class DatabaseService { ... }

// Force sync order: Wait for DatabaseService before creating CacheService
@Singleton(dependsOn: [DatabaseService])
class CacheService {
  final DatabaseService db;
  CacheService(this.db);
}
Loading…