
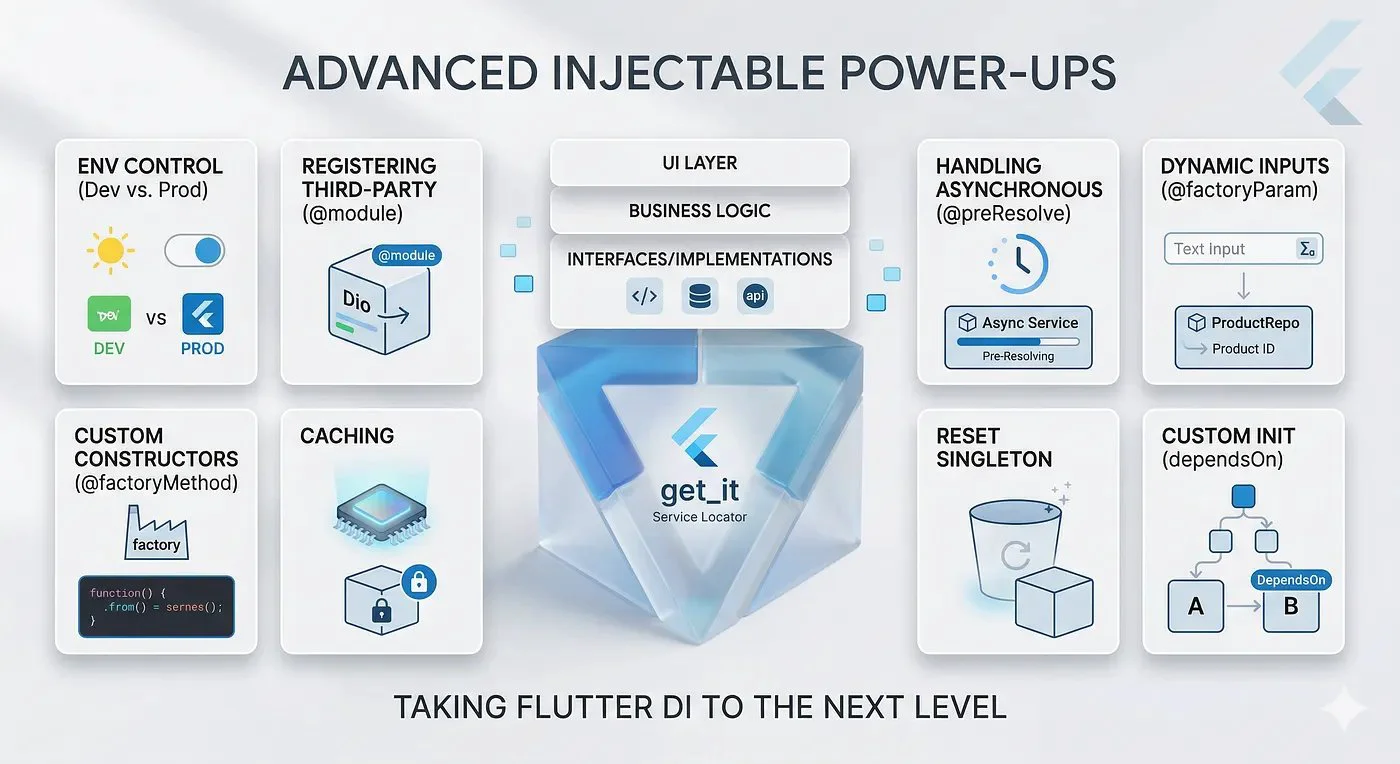
Once you grasp the basics, injectable offers several advanced features to manage real-world, complex app architectures. Here are seven essential techniques to master:
Table of Contents
---
1. Environments (Dev vs. Prod)
In a professional app, you rarely use the same database or API endpoints for development and production. injectable handles this beautifully using the @Environment annotation.
You can create multiple implementations of your WeatherRepository and tag them:
const dev = Environment('dev');
const prod = Environment('prod');

// The Mock/Dev implementation
@LazySingleton(as: WeatherRepository, env: [dev])
class DevWeatherRepositoryImpl implements WeatherRepository {
  @override
  Future<String> getCurrentWeather(String city) async {
    return "Mock Weather: 20°C in $city";
  }
}

// The Real/Prod implementation
@LazySingleton(as: WeatherRepository, env: [prod])
class ProdWeatherRepositoryImpl implements WeatherRepository {
  final ApiClient _apiClient; // Injected dependency

  ProdWeatherRepositoryImpl(this._apiClient);

  @override
  Future<String> getCurrentWeather(String city) async {
    return await _apiClient.fetchWeather(city);
  }
}
When initializing get_it, simply pass the environment you want to run:
// Run the dev environment
configureDependencies(environment: dev.name);
---
2. Registering Third-Party Types with @module
You can easily annotate your own classes with @injectable, but what about third-party packages like Dio or SharedPreferences? You don't own their source code, so you can't add annotations to them.
To solve this, use a Module. A module is an abstract class where you define getters or methods that return the third-party instances.
@module
abstract class RegisterModule {
  // Registering a simple third-party package
  @lazySingleton
  Dio get dio => Dio(BaseOptions(baseUrl: 'https://api.weather.com'));
}
Now, injectable knows how to provide Dio whenever another class requests it in its constructor!
---
3. Handling Asynchronous Dependencies (@preResolve)
Sometimes, initializing a dependency takes time. A classic example is SharedPreferences.getInstance(), which returns a Future. You can't just inject a Future into a class that expects the synchronous instance.
Use the @preResolve annotation inside your module:
@module
abstract class RegisterModule {
  @preResolve
  Future<SharedPreferences> get prefs => SharedPreferences.getInstance();
}
When you use @preResolve, you must also await your get_it initialization in your main.dart:
void main() async {
  WidgetsFlutterBinding.ensureInitialized();

  // Await the setup!
  await configureDependencies();

  runApp(const MyApp());
}
Now, you can safely inject SharedPreferences directly into your repositories or local storage classes without worrying about Futures or async initialization issues.
---
4. Dynamic Inputs with @factoryParam
Sometimes, you can’t inject everything at startup. What if your ProductDetailsBloc needs a specific productId that you only get when the user taps a list item? You can pass runtime parameters directly into your injected classes using @factoryParam.
@injectable
class ProductDetailsBloc {
  final ProductRepository repository;
  final String productId;

  // Tell injectable that productId will be provided at runtime
  ProductDetailsBloc(
    this.repository,
    @factoryParam this.productId,
  );
}
When you need the Bloc, simply pass the parameter through get_it:
// The repository is injected automatically, but you provide the ID!
final bloc = getIt<ProductDetailsBloc>(param1: 'item_12345');
get_it supports a maximum of two factory parameters: param1 and param2.---
5. Custom Constructors with @factoryMethod
By default, injectable looks at your default constructor to resolve dependencies. But what if you are using a named constructor (like .from()) or a static create method? Just annotate it with @factoryMethod.
@injectable
class ApiClient {
  final String baseUrl;

  ApiClient._internal(this.baseUrl);

  // Injectable will use this specific method to create the instance
  @factoryMethod
  static ApiClient create(ConfigService config) {
    return ApiClient._internal(config.getBaseUrl());
  }
}
---
6. Caching and Resetting Lazy Singletons
Singletons act as an in-memory cache for your app. But what happens when a user logs out? You don’t want the next user to see the previous user’s cached profile data.
You can define a teardown process using @disposeMethod.
@LazySingleton()
class UserProfileCache {
  Map<String, dynamic>? userData;

  @disposeMethod
  void dispose() {
    userData = null; // Clear the cache
    print("Cache cleared!");
  }
}
When the user logs out, you simply tell get_it to reset that specific singleton. It will automatically call your @disposeMethod and wipe the instance. The next time you request UserProfileCache, get_it will create a fresh one!
// Call this on logout
getIt.resetLazySingleton<UserProfileCache>();
---
7. Custom Initialization Order (dependsOn)
Usually, injectable is smart enough to figure out which dependencies need to be initialized first by looking at the constructor tree. However, if you have asynchronous singletons that rely on side effects, you might need to force a strict initialization order.
Use the dependsOn property to tell injectable: "Do not create Class B until Class A is fully initialized."
@singleton
class DatabaseService { ... }

// Force sync order: Wait for DatabaseService before creating CacheService
@Singleton(dependsOn: [DatabaseService])
class CacheService {
  final DatabaseService db;
  CacheService(this.db);
}
Loading…